
Step 1: Prepare The Loft Space
The first step to installing loft insulation is to prepare the loft space. Before starting, make sure the loft is clean, dry and free from any debris, dust or clutter. It’s also important to clear the area prior to installation to ensure the insulation is fitted correctly. You should also check that the loft is well-ventilated before starting the installation, using extractors if needed, as without proper ventilation, condensation can occur and mould can develop. Once the loft is cleared and cemented, it’s time to start the installation process.
The loft should be cleaned out right away, and the area should be vacuumed to remove any remaining dust. Inspect the loft to determine if any light fixtures from the rooms below protrude. In that case, you must cover them with downlight caps, often referred to as downlight covers, which are only placed on top. These ingenious caps enable air circulation around the light fixture to prevent overheating.
Use crawling boards that are positioned in between the joists. Loft panels are perfect for the purpose, and to distribute the weight equally, they must sit over at least three joists. Never place your foot between the joists because you risk falling through or worse, placing your foot through the bedroom ceiling.
Step 2: Work Out How Much Insulation You Need
Calculate the space you will need to insulate by dividing the floor's width by its length using your tape measure. After that, gauge the distance between the joists. The height of the joists themselves should also be measured. You'll need these three numbers before making a purchase, so note them down.
Making sure your home has the appropriate amount of insulation is crucial. The size of your property, the insulation levels already in place, the style of your ceiling, and the height of the joists will all affect how much you will need. Although 270mm of insulation is typically advised, you can speak with your local Energy Saving Trust (EST) for guidance on what would be most appropriate for your property.
Need assistance finding loft insulation near you?
Get a QuoteStep 3: Buy The Insulation You Need
There are numerous insulating options, and each offers advantages of its own. For example, foam boards can provide the highest levels of thermal efficiency, and mineral wool is a terrific option for soundproofing. But if you're searching for a versatile material, glass fibre is typically a good choice. After choosing the insulation you want to buy, make sure to get the required quantity, keeping in mind that some may be lost during installation.
You must first install insulation between the joists that is 100mm thick if your joists are 100mm high. Once the surface is level, you can add extra insulation on top to reach the 270mm level that the government advises. Cutting will be minimised if you choose a width that is closest in size to the area between your joists. Most loft rolls are designed with those two sizes in mind and most joists are spaced either 380mm or 570mm apart. Find the roll that is closest to the width of your joist spacing, for example, 380mm.
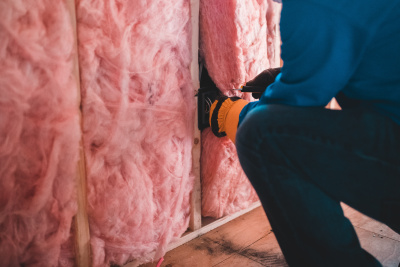
Step 4: Grab The Equipment And Lay The Insulation Over The Top Of The Joists
To begin, put on gloves and a protective mask since you don't want anything harmful to enter your lungs. Making sure there are no gaps between the insulation sheets as you spread them across the top of the joists and securely fasten them with netting. Wafer boards can be used to generate additional room if your joists aren't deep enough for the recommended 270mm of insulation.
It's time to add extra insulation on top at a 90-degree angle to bring the thickness up to the recommended 270mm now that you have a 100mm layer between the joists. Spread the insulation over the top of the joists, leaving no gaps between the strips, starting from the location that is farthest from the hatch. When beginning a new roll, butt the edges together, being careful not to overlap or compress them too much.
Step 5: Don’t Forget To Insulate The Hatch, Water Pipes And Tank
According to experts, failing to insulate the loft hatch can result in a loss of up to 5% of a home's heat. To accomplish this, you might either fix polystyrene with PVA adhesive or staple some insulation to the interior of the loft hatch door. To make the space even warmer, put draught-proof strips on the exterior of the hatch. Insulating your loft hatch will stop chilly draughts from entering your home's living area. Your home's temperature and energy costs may be significantly affected if your loft area is currently uninsulated. This can be a smart decision even if your loft area is already well-insulated.
You run the danger of pipes and tanks freezing in the chilly loft above by insulating the joists. Pipe insulation, which you can tape down after cutting to size, will need to be installed. Tank jackets can be used to insulate cold water tanks. To determine the correct size, measure your tank. Insulating your hot water pipes reduces heat loss and can raise the temperature of the water 2°F-4°F higher than uninsulated pipes, allowing you to lower the temperature setting on your water heater. You'll also conserve water because you won't have to wait as long for hot water when you turn on a tap or showerhead. Pipe condensation is a common problem, especially when cold-water lines come into touch with warm, humid air. Pipe insulation decreases condensation, heat gain or loss, the potential of corrosion under insulation (CUI), and the formation of mould and mildew.
In this article: