
Identification: Height And Lean
The five-stage felling plan's initial step is a thorough identification and safety setup. Start by evaluating the tree's dimensions, height, and lean. Find any surrounding trees that would present a risk if they were to sustain harm from the tree cutting. Additionally, keep an eye out for any fences, telephone cables, power lines, or other structures that might be in the way of a falling tree. Always make sure to have a plan for an escape route before starting. There are several resources available for measuring a tree's height, including transits, transit applications, and clinometers.
The "stick trick" is fairly precise and makes use of supplies that are always present at a job site, including a stick and your arm, hand, and eyes. Using the "stick trick", you can determine the height of a tree by finding a straight stick that is the same length as the distance between your hand and eye when your arm is extended straight. Find a stick that is the right length for you by placing one end on your shoulder and holding the other end in your palm. The tree won't fall in the intended direction if it has a side lean of more than three feet; a new felling strategy of using ropes or machines might be better suited.
Equipment
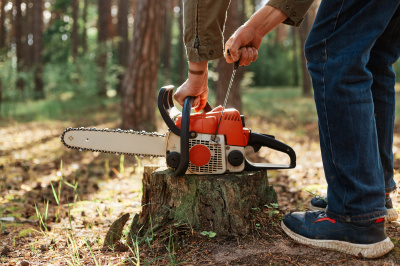
A chainsaw is a piece of equipment that is required before starting any felling work. Check to see if your chainsaw is the appropriate size for the task and if the chain has been sharpened. Additionally, you'll need safety glasses, chaps, a hard hat, and earplugs. You'll also need a sledgehammer, cable, rope, and wedges. With the help of your tools, you can make sure the tree will fall in the direction you want it to - and it will be securely fastened after being cut. Finally, remember to pack enough food and water for the task, as well as a cell phone just in case.
Every time a tree is cut down, wedges must be kept on-site as equipment. No matter which way the lean is always put a wedge in the rear cut. To insert the wedges into the cuts, an axe or hammer is required. A throw line, rope, or mechanical advantage may be required to assist in pulling the tree over if it has a back or side lean. If the necessary equipment is not accessible, abandon the project and postpone it until another day. Alternately, make sure the area is secure and then go and acquire the tools you need to do the operation.
Need assistance finding tree felling near you?
Get a QuotePlanning and Escape Routes
90% of tree-falling accidents occur within 15 seconds of the tree moving and within 5 feet of the trunk. It's known as the "90-15-5 rule". Avoid falling prey to this rule. Plan and prepare the escape route after the felling direction has been identified. The path must be at a 45° angle concerning the fall direction. Spend some time removing obstacles that could trip you up, such as branches, overgrowth, and debris. As soon as the tree starts to move in response to the back cut, use this escape route. Throughout the escape, keep an eye on the descent. This step, not turning your back on a moving tree, is crucial. One of the most crucial components of any felling plan is having a properly defined and prepared escape route.
According to statistics, having an effective escape plan, that you follow, greatly increases your safety. Reports on accidents and fatalities also provide some helpful information about employees hurt by falling trees. Because branches, crowns, and trunk pieces frequently fall close to the base of a falling tree, the area either to the side of or directly behind the tree is extremely dangerous. The escape route plan is frequently influenced and located at an angle that is diagonal from the direction of the falling tree.
Cutting
Cut the notch in the direction the tree will fall in step four. For two reasons, an open-faced notch with a 70- to 90-degree angle is safer than a 45-degree notch. The advantage of the broader, open-faced notch is that the tree can fall all the way to the ground before the two cut sides converge. This aids in maintaining the hinge and the control it offers. Additionally, the removal of this notch enables the feller to exit the danger zone and travel far along the escape path before the tree shifts.
However, using a typical notch (or Humboldt notch, which has an upward lower cut and a horizontal top cut) is also appropriate. The operator can cut the back strap and start the escape before the tree moves, making the open-faced notch safer than the traditional notch. Additionally, as the tree falls, it keeps the hinge's integrity (and control) intact. Before the tree touches the ground, the traditional notch will shut, possibly shattering the hinge and losing the control it offers. The operator remains in the danger zone since the rear cut is not finished until the tree moves.
Bore and Back Cuts
Construct a bore cut, also known as a plunge cut, when utilising an open-faced notch to construct a hinge that is the right thickness for the tree. The hinge should be 10% of the remaining tree material after the notch is removed if the tree's diameter is 24 inches or less. The hinge should be 5% of the tree's remaining material after the notch is removed if the tree is more than 24 inches in diameter. Before confronting a standing tree, practise a bore cut if you are unfamiliar with it.
Throughout the full diameter of the tree, the hinge should be the same thickness. The back strap will support the tree while it is in place. Cut the back strap (or tap the wedge) and take the pre-approved escape route away from the area quickly. If utilising a standard notch, as soon as the tree starts to move, perform the back cut and take the escape route. Make one or two holes in the tree trunk that are between two and four inches deep before you remove the tree from the stump. By doing so, the tree will become more pliable and less likely to adhere to the stump. Then, to continue releasing the tree from the stump, make two back cuts on the tree.
A solid five-step felling plan can make the difference between a project being safe and successful. You can successfully fell a tree with correct identification and safety measures, then go on to the next task. To ensure that you can show up to your next job in the same condition as you left it, keep in mind that all safety procedures must be performed before, during, and after felling work.
In this article: