Can You Paint Over Damaged Plaster or Should You Fix It First?
Painting a room is one of the fastest ways to change how it looks and feels. You might think that a quick coat of paint will hide any problems and give you a fresh new finish.
But if the wall has damaged plaster, it is not that simple. Plaster is the surface your paint sticks to, and if it is not in good shape, the paint will not stay looking good for long. That is why many people wonder whether they can paint over the damage or if they should do Plastering Repair first.
This is an important choice. Damaged plaster can cause paint to peel, crack, or bubble. It can also lead to other problems, like damp and mould. Fixing the plaster before painting can help you avoid these issues and make the room look better in the end.
Painting over damaged plaster might seem quicker, but it often creates more work later. The time you save now might cost you more later on. That is why we will look closely at what happens when you skip repairs and when painting right away might still be okay.
This guide will also explain how to spot the signs of damage, what kind of repair might be needed, and how to prepare plaster before painting. That way, you can be sure your hard work will last.
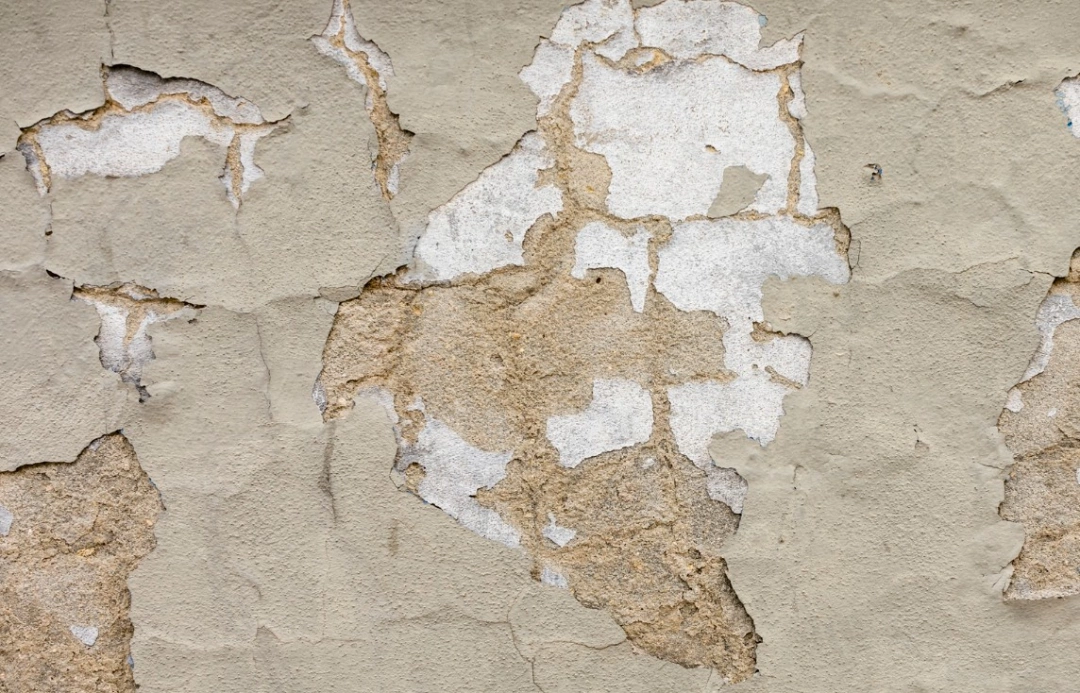
What Happens If You Paint Over Cracked or Flaking Plaster
It might be tempting to ignore small cracks or flakes in your plaster and paint over them. But this can lead to bigger problems.
Cracks Can Spread Under the Paint
When you paint over cracks, you are only covering them up, not fixing them. Over time, those cracks can grow wider. The paint may start to split, showing lines and gaps through the surface. Even a small crack can spoil the smooth look of the paint if left alone.
Also, painting over cracks without any filler does not make them disappear. The shape of the crack still shows, especially when the light hits it at an angle.
Loose Plaster Causes the Paint to Bubble or Peel
If the plaster is flaking or pulling away from the wall, it cannot hold the paint well. Once the paint dries, it might lift off in patches. These bubbles or peels can happen within days or weeks.
In these spots, the paint has nothing solid to grip. A thin coat of paint cannot hold broken plaster in place. You will need to scrape off the loose parts and start again later, which means more time and effort.
Moisture Builds Up Behind the Paint
Damaged plaster can let in moisture. When you paint over it, that moisture gets trapped. This can lead to bubbles under the paint, wet patches, and even mould in some cases.
Walls near windows, kitchens, or bathrooms are more likely to get damp. If the plaster is cracked or weak, water can get in and damage the wall further. Fixing the plaster before painting helps stop this from happening.
Patchy Paint and Uneven Colour
Plaster in poor condition does not absorb paint evenly. Some areas soak up more than others, which makes the colour look patchy. This is known as uneven suction. Even with a few coats of paint, the result may still look blotchy.
Good Plastering Repair helps stop this. By sealing the surface and smoothing out the texture, you get a finish that looks even and lasts longer.
Need assistance finding plastering repair near you?
Get a QuoteWhen Painting Is Fine and When It’s a Bad Idea
There are times when it is safe to paint over plaster without major repair. Knowing when it is fine and when it is not can save you from doing extra work.
If your wall has only a few small hairline cracks, and they have not changed over time, you might not need to worry. These tiny cracks can often be filled with a bit of filler and smoothed over. As long as the plaster feels firm and dry, you are likely safe to paint.
Fresh plaster that has been allowed to dry completely is also fine to paint. The surface will often turn a light pink or pale colour when dry. Before you use your colour paint, it is best to apply a mist coat. This is a watered-down version of your normal paint that helps seal the surface.
However, you should not paint when there are clear signs of damage. If plaster falls off when touched, or if the wall sounds hollow when tapped, painting over it is a bad idea. These signs show that the plaster is not holding to the wall properly. Any paint you apply will only cover the problem, not solve it.
Plastering Repair does not always mean redoing the whole wall. You can patch smaller areas and still get a good result. This step might take a bit longer, but it saves you from fixing peeling paint or more serious issues later on.
Why Fixing the Plaster First Usually Saves Time and Money
Fixing plaster might seem like more effort at first, but in most cases it is the smart choice. If you paint over damage, you often end up spending more time and money fixing the results later.
When the wall is sound, paint goes on better and stays in place. You do not need as many coats and you are less likely to deal with bubbling or cracking in the future.
It also protects your home. Plaster acts like a shield for the wall. When that shield is damaged, damp and cold can get in. That can lead to problems like mould and higher energy bills.
In the long run, Plastering Repair means fewer problems. You save time on repainting, avoid extra costs, and get a result you can be proud of. If you are selling your home, neat walls with a smooth finish also help make a good first impression.
It is usually easier to fix plaster before you paint than it is to fix painted walls later. Once paint goes on top, any problems underneath become harder to reach. That is why taking a little extra time now can save you even more time in the future.
How to Prepare Plaster Properly Before You Start Painting
To get the best finish when painting, the wall needs to be ready. Preparing plaster the right way makes sure the paint sticks and looks even.
Clean the Wall
Before doing anything else, clean the wall. Dust and grease stop the paint from sticking. Use a soft brush or vacuum to remove loose dust. Then wipe the wall with warm water and a little soap to remove grease or dirt.
If the wall has stains or cooking splashes, a sugar soap solution works well. Make sure you rinse it off completely and let the wall dry before moving on to the next step.
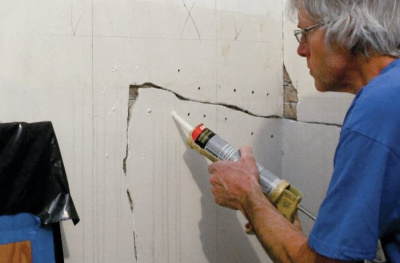
Fill Any Cracks and Holes
Use a good quality filler to patch any cracks or holes in the wall. Press the filler in with a flexible knife and smooth it out as level as you can. Once it dries, sand the area gently to get a flat finish.
Use your hand or a torch to check for bumps or dips. If anything feels rough, sand it again. The smoother your wall is now, the better the paint will look.
Apply a Primer or Mist Coat
Before using your main colour, apply a primer. For new plaster, use a mist coat made by mixing paint with water. This helps the wall absorb paint evenly and stops the top layer from drying too fast.
If the plaster has already been painted, a standard primer will help seal the surface. This makes the final paint colour look brighter and smoother.
Taking these simple steps helps make sure your work lasts. A well-prepared wall gives the best finish and saves you from having to paint again too soon.
In this article: